**Updates Log**
9/27/22 code updated for millis() rollover
2/3/23 parts list included
So I’m, really happy about this new board I had made.

It uses a Arduino Nano to control PWM signals for six different channels of lights. There are two potentiometers, one to select the effect, and a second to change the speed of that effect. The board uses IRLB8721 mosfets to control current to the lights. According to Adafruit these mosfets are capable of switching 15A of current so each channel could run several lights in parallel.
These are the lights I use. They were suggested by another haunter, because they are waterproof, they fit inside a PVC fitting, and draw only 60mA at 12V DC. To find them you can search Eagle Eye LED 18mm on Amazon/EBay/AliExpress.


Here’s a 4 minute demo of the board in the lab:
There are 4 different effects:
1. Solid - all lights are on and dimmable by the speed potentiometer

2. Firelight - a low flicker meant to evoke the light of a fire. Works well with several amber on the same channel and 1 dim red on another channel
3. Wavey - All channels slowly pulse on and off at slightly different wavelengths so they don’t synchronize. Speed potentiometer controls how fast they pulse
4. Lightning - Each channel strobes on with a random delay and a random number of flashes. Speed potentiometer controls how frequent the flashes are.
**I'm not in the business of selling Halloween circuit boards, but I usually have to order more than I need for any given project. If you're into DIY electronics (and let's face it, you wouldn't be reading this otherwise), and want one of my boards, send me a PM.**
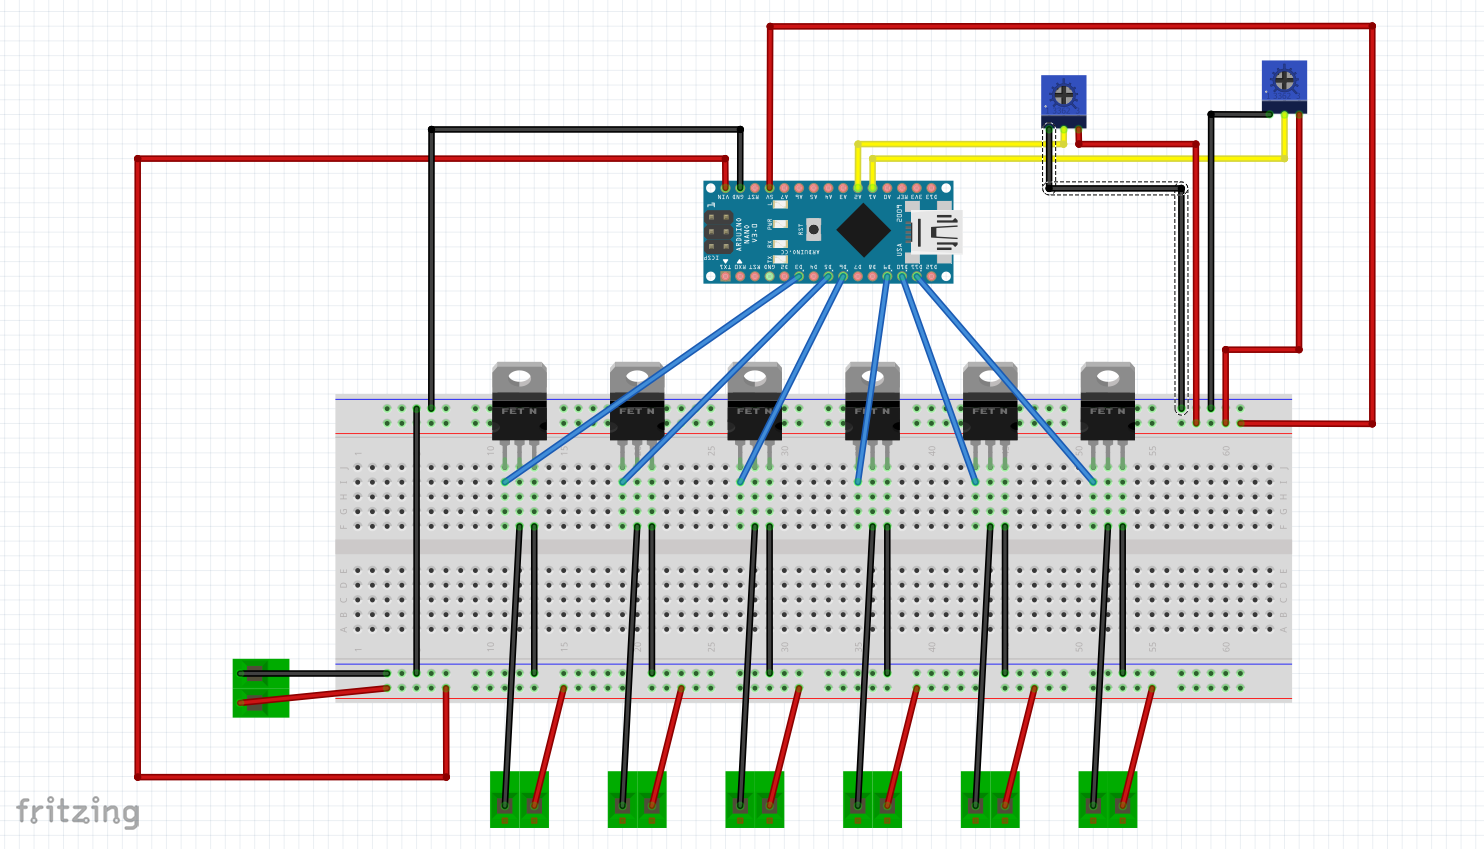
Here's the Fritzing:

Here's the code for the nano: (updated 9-27-22 to fix millis() rollover.)
// Jekyll-Labs Lightboard v1.0
//  D2 sensor
//  D3 Power MOSFET (PWM avail)
//  D4 sensor
//  D5 Power MOSFET (PWM avail)
//  D6 Power MOSFET (PWM avail)
//  D7 Unused
//  D8 Unused
//  D9 Power MOSFET (PWM avail)
//  D10 Power MOSFET (PWM avail)
//  D11 Power MOSFET (PWM avail)
//  D12 unused
//  D13 unused
//  A0/D14 Unused
//  A1/D15 10k potentiometer
//  A2/D16 10k potentiometer
//  A3/D17 Unused
//  A4/D18 Unused
//  A5/D19 Unused
//  A6/D20 Unused
//  A7/D21 Unused

int ledpin[] = {3, 5, 6, 9, 10, 11};
int effectpin = A1;
int freqpin = A2;
int effect = 0;
int freq = 0;
int brightness[6];
int oldbrightness[6];
int fldelay = 75; // fire light flicker delay
int flalpha = 20; // fire light alpha 0-100 (low values less dynamic changes)
unsigned long  lastupdate[6];
int between=500;
int randwavel[6];
int wavelength[6];

void setup() {
  Serial.begin(9600);
  randomSeed(A0);
  for (int i =0; i<=5; i++) {
    pinMode(ledpin[i],OUTPUT);
    digitalWrite(ledpin[i],LOW);
  }
  for (int i =0; i<=5; i++) {            //setting variables for flicker
    brightness[i]= random(256);
    oldbrightness[i] = brightness[i];
    randwavel[i] = random(500);
  }

}

void firelight(){
  for (int i =0; i<=5; i++) {
    if ((millis()-lastupdate[i])>fldelay) {
      lastupdate[i] = millis();
      brightness[i] = random(255);
      brightness[i] = (flalpha * brightness[i] + (100 - flalpha)*oldbrightness[i])/100;
      oldbrightness[i] = brightness[i];
      analogWrite(ledpin[i],brightness[i]);
    }
  }
}

void wavey(){
  for (int i =0; i<=5; i++) {
    wavelength[i] = (freq/100)*1500 +1000 + randwavel[i];
    int remainder = millis() % wavelength[i];
    if (remainder <wavelength[i]/2){
      brightness[i] = map(remainder, 0, wavelength[i]/2,-128,384);
      if (brightness[i]<0) brightness[i]=0;
      if (brightness[i]>255) brightness[i]=255;
    }
    if (remainder >=wavelength[i]/2) {
      brightness[i] = map(remainder,wavelength[i]/2,wavelength[i],384,-128);
      if (brightness[i]<0) brightness[i]=0;
      if (brightness[i]>255) brightness[i]=255;
    }
    analogWrite(ledpin[i],brightness[i]);
  }
}

void solid(){
  freq = map(freq,100,923,0,255);
  if (freq<0) freq=0;
  if (freq>255) freq=255;
  for (int i =0; i<=5; i++) {
    analogWrite(ledpin[i],freq);
  }
}

void lightning(){
  for (int i =0; i<=5; i++) {
    if ((millis() - lastupdate[i])> between) {
      for (int c=0; c< random(7); c++){
        digitalWrite(ledpin[i], HIGH);
        delay(40);
        digitalWrite(ledpin[i], LOW);
        delay(10);
      }
      int lidelay = map(freq,0,1023,3000,20000);
      between = 500+ random(lidelay);
      lastupdate[i] = millis();
    }
  }
}

void loop() {
  freq = analogRead(freqpin);
  effect = analogRead(effectpin);
  if (effect<100) solid();
  if ((effect>=100)&(effect<512)) firelight();
  if ((effect>=512)&(effect<923)) wavey();
  if (effect>=923) lightning();
  delay(10);
}
