
Most of these LEDs have a small integrated circuit embedded in the plastic head that can seen if you look closely.

There’s a great discussion of reverse engineering these flicker LEDs in Tim’s Blog post “Hacking a Candleflicker LED”. He uses a logic analyzer to look at current drawn by the flicker LED. This reveals what appears to be a PWM signal of varying intensity that controls the flicker effect.
He then goes on a really impressive deep dive quantifying the PWM levels and speculating on the pseudorandom sequence generation. —Go read it, seriously. It’s not long and really fascinating.—
Windell Oskay, over at Evil Mad Scientist, put together a great post "Does this LED sound funny to you?" in which he uses a PNP transistor to amplify the signal being drawn by the flicker LED. he then sends this to a LED and then a speaker. Unfortunately the STX790a transistor he selects has been discontinued, and I had some difficulty finding a similar spec’d transistor (ie stopped after 10 minutes of google-ing). I did have some PN2907 PNP transistors lying around. I tried one of those in Oskay’s circuit.
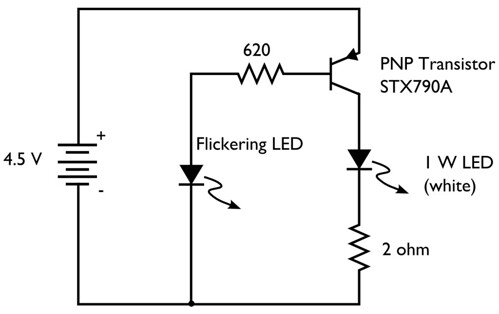
The flicker LED would flicker nicely, but unfortunately just caused the transistor to continuously conduct. The secondary LED would just stay lit, perhaps a bit dimmer than usual. Interestingly enough, when I hooked the transistor up backwards (still in the same place in the circuit, but just swapping the collector and the emitter leads) both the flicker LED and the secondary LED would flicker. The effect seemed stable. The transistor was still working as a PNP transistor, but just with unknown specs. Seemed kind of sketchy and not exactly something I could recommend to others… So back to my parts box…
I have several "logic-level" N-channel mosfets lying around in my parts box, specifically the IRLB8721 and the FQP30N06L. I use both of these frequently for rapid switching (PWM and otherwise) up to a few amps of current at 12V.
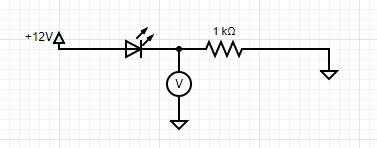
I set up my mini digital oscilloscope to query the voltage at a few points along a simple flicker LED circuit and found that I could reliably detect the signal between the LED and the resistor when they were arranged like this.


No comments:
Post a Comment